Move-in Checklist Template
We use checklists to stay organized in our personal lives, and they are equally important in professional settings. A move-in checklist is a valuable tool for both tenants and landlords. When landlords rent out a furnished property, it is natural for them to want to protect their belongings, just as tenants want to safeguard their rights. This checklist helps ensure that the condition of the property is clearly documented, reducing misunderstandings and disputes for everyone involved.
What is a move-in checklist?
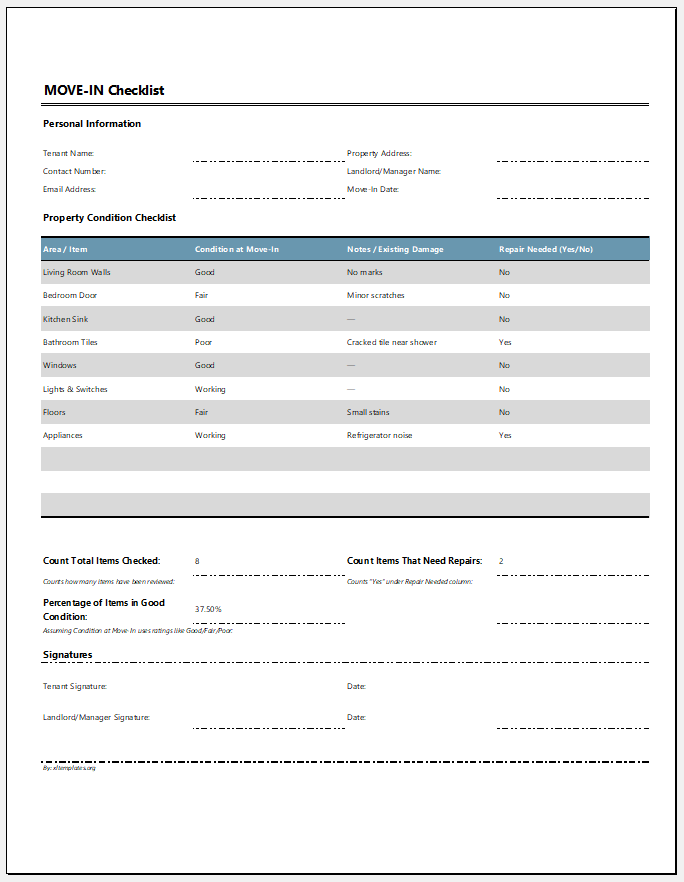
As the name suggests, a Move-in Checklist is prepared just before a tenant moves into a property. After the rental agreement has been signed and both parties are ready to begin their tenancy, this document is used to record the condition of the property and its contents.
The checklist helps protect both the tenant and the landlord. The landlord typically collects a security deposit from the tenant, and if any damage occurs during the tenancy, the cost of repairs may be deducted from this deposit. By using the checklist, both parties agree on the condition of the property at the start of the tenancy, ensuring a clear reference for comparison when the tenant moves out. This helps prevent disputes over damages and missing items.
How to Use a Move-in Checklist?
A move-in checklist is used to document the condition of a property and the items that belong to the landlord at the time of occupancy. Typically, the process works as follows:
When a tenant moves in, they are usually given a short period (e.g., one week) to walk through the property and note any existing items, damages, or issues. The tenant then shares this checklist with the landlord or property manager. Together, they review each room and item, confirming the condition of everything and adding any missing details.
By completing the checklist jointly, both the tenant and landlord are on the same page regarding the property’s condition. This reduces misunderstandings and minimizes the chances of disputes arising later.
Here is an Excel template for help and guidance.
Advantages of a Move-in Checklist
A move-in checklist is an essential document that, once completed and reviewed by all parties, is often attached to the rental agreement for the duration of the lease. Its use provides several important benefits:
Documentation of Property Condition
The checklist records the condition of the property and all items present. If any belongings are already damaged, the tenant can note this, ensuring they are not held responsible for pre-existing issues when moving out.
New or brand-new items are also noted, which encourages tenants to handle them with care. One of the greatest benefits of the checklist is that it provides a clear, documented record of damages, reducing potential disputes later.
Prevents Disputes over Security Deposits
Security deposits are refundable, and landlords are responsible for returning them once the tenant moves out. By documenting the condition of the property and its contents, both parties have a clear reference. This ensures that the tenant uses items responsibly and the landlord does not incur unnecessary losses. With everything recorded, disputes over deposits are minimized.
Facilitates Repair Requests
Since the checklist tracks the condition of each item, tenants can easily identify and report items that need repair. The landlord can address these issues, and if a repair is not possible, the tenant is not held accountable for the damaged items. This creates clarity and fairness for both parties.
Encourages Tenant Care and Responsibility
Knowing that every item and its condition are documented encourages tenants to take extra care of the property. Tenants are more likely to handle belongings carefully, helping maintain the property in good condition throughout the lease.
Excel Template: 215 KB
- Move-in Checklist Template
- Camping Checklist Template
- Kids Screen Time Checklist
- Kids Daily Activity Checklist
- Kids Summer Activities Checklist Template
- Start of the Winter Family Checklist
- Winter Travel Checklist Template
- Home Servant Daily Chore List
- General Symptom Checklist Template
- Children Safety Checklist Template
- Sunday at-Home to-do List Template
- Maid Responsibility Sheet
- Pet Care Checklist Template
- Daily Dog Care Checklist
- Restaurant Opening & Closing Hour Checklist
← Previous Article
Camping Checklist TemplateNext Article →
Monthly Study Reminder & Planner